OPUS and Assessment 2 - Adding Custom Assessments
This is a follow on to the previous article on setting up assessment in OPUS, an on-line system for placement learning. You probably want to read that first. This is much more advanced and requires some technical knowledge (or someone that has that).
Making New Assessments
Suppose that OPUS doesn't have the assessment you want, then you will have to build your own, from scratch, or by modifying an existing one. This takes some minor HTML skill and access to your OPUS code to add a new file. So if you can't do this yourself, ensure you get appropriate support.
Look at an existing assessment closely first. Go back to Advanced on the OPUS admin menu, and then Assessments.
For each assessment, clicking on Structure allows access to underlying variables that are captured. These can be numeric, text, or checkboxes, and some validation is possible too.

you need to work out what things you will capture, and create a skin for the assessment, most usually from modifying one from another. This following snippet from a related Smarty template shows this is just HTML, but OPUS, through Smarty drops in an  assessment->flag_error("mark5")}
<input type="text" class="data_entry_required" size="2" value="{ assessment->flag_error("comment5")}
{include file="general/assessment/textarea.tpl" name="comment5" rows="7" cols="60"}
</td>
</tr>
<tr><td colspan="5">Marking Scheme</td></tr>
<tr>
<td> Uses language to clearly express views concisely </td>
<td> Expresses clearly but with some minor errors </td>
<td> Good expression, logical flow, reasonably concise </td>
<td> Reasonable flow, some contorted expressions, a little verbose </td>
<td> Poor expression, verbose, some colloquialisms </td>
</tr>
...
...
This is a representative snippet. You can see this full template here. Note the "special" code in between braces { }. The variables in the template pertain to the names in the structure.
Create and Save Your Template
Create your template, probably using one of the existing ones to help you understand the format. This provides the layout and skin for your pro-forma and allows you to do anything you can wish with HTML/CSS. Be mindful of security considerations, but you aren't writing main code, just an included bit. OPUS will top and tail the file for you when it runs.
Save it under the templates/assessments directory in your OPUS install. I recommend you make a subdirectory for your institution.
Avoid using the "uu" directory. This is used for pre-shipped assessments and those used at Ulster University. There is a chance your changes will get clobbered by a new OPUS version if you put your template in there.
Adding the Assessment variables into OPUS
Then you need to create your new Assessment item itself as at the top of the article. Once you have created it, click on structure and add each variable you will capture in turn, whether it is text, a number, or a checkbox, and any simple validation rules - such as minimum or maximum values.
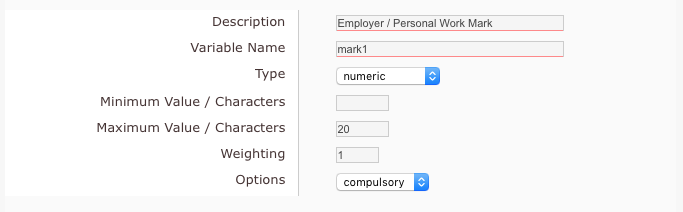
The final detail of one variable
The description appears in feedback and validation, so make sure it is meaningful to the end user. The name is the variable name as it appears in your template. The weighting field is used to determine if numeric values contribute to the score. Usually use 1 if you want the score to be counted, and 0 if you want the score to be ignored. Finally you can choose whether each field is compulsory or not. Optional fields will be ignored in a total when OPUS creates a percentage.
Once complete, add your new assessment into a test regime as detailed in the first article and do some careful testing before adding the regime to live students.
One thought on “OPUS and Assessment 2 - Adding Custom Assessments”